Project Sunshine - The Box
The basic box setup.
I consider this to be part 0, as the setup here might be very specific to where you get your box. I’m using Ubuntu here as the OS of choice but it can be any other linux flavor as well.
Most vendors will probably have documentation with a basic setup guide for what you should be doing in order to be able to connect to it. I’m going to assume that it comes with a new user, either a password or preferably an authorized ssh key.
Basic Setup
I’m not going to be diving deep into this as I’m not a linux sys admin nor do I want to pretend like I am. So I’ve followed the docs from my vendor here.
This setup means I now have a:
- Linux box with a new user with admin privileges
- SSH configured using a public key on port 2222 and hardened disallowing some features we will not be using
- A basic firewall allowing, for now, just port 2222. If your vendor includes a firewall upstream from your box you should use that too to not rely on a single layer of defense.
- Updated all the packages and made sure they’re all current
- Put in some basic countermeasures for intrusion prevention
That’s all we need for now on the server end. With this set we can get started on the actual application.
Bitwarden
While this has nothing to do with the server, I do want to call out that I’m using bitwarden, hosted in Europe, for my passwords/keys. The reason I mention this is because I think it ties in really nicely with server authentication.
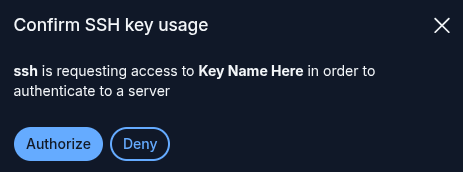
I store my SSH keys in bitwarden and I’ve set it up to integrate with the ssh-agent as described here. This means that, whenever I use ssh or scp or any other CLI tool, I will get a neat popup from bitwarden before it grants usage to the key like this:
The one caveat with this is that, as of writing, it doesn’t deal well with having a lot of ssh keys. I’ve solved this by creating individual files with the public key in each and then set that as the IdentityFile. The script for creating one of these is (replacing test for the name of your key)
ssh-add -L | grep "test" > ~/.ssh/server.pub
Then you can use that pub file as the IdentityFile when connecting. In my case I do this through an entry in ~/.ssh/config like:
Host test-server
    HostName {your-ip}
    User {your-username}
    Port 2222
    IdentityFile ~/.ssh/server.pub
And with that set I can now connect using ssh test-server or use that name instead of the ip and username in scp etcetera.
Comparison With Cloud
When deploying to the cloud, none of this needs to be setup, you would have different setup to do though. Creating a user within your account, assigning that user privileges and then keeping it’s credentials/tokens securely somewhere. We’ll get to a more interesting comparison later as we start looking at actually hosting the application and other ‘services’ it needs.
Having this does mean that you’re now on the hook for making sure it stays up to date. This can be as simple as a weekly login and running updates on your package manager though.